
Last week, I gave a "learning report" to my team, which is actually a weekly technical sharing session where everyone has a chance to present. This time it was my turn. As a newbie in the team, what should I talk about?
After thinking it over, I suddenly recalled a tricky problem I often encountered: When running an iOS project on a real device, the project configuration's signing (Targets > Signing & Capabilities) reports an error before the project even starts. This happens whether it's my own project, a third-party open-source library, or a company project.
Although I can find answers every time I search on Google or ask colleagues, I can only say that I have a vague understanding of why it can be resolved and why signing is necessary for running iOS projects on real devices.
However, I finally understand the secrets behind it! If you have the same confusion, keep reading, and I guarantee you'll thoroughly understand it this time—the principles behind iOS signing!
Article Goals#
By the end of this article, you will have the ability to easily solve the following questions:
- How to run your own iOS project or iOS open-source library on a real device?
- How to run the company's iOS project on a real device?
Additionally, the ultimate goal of this article is: whenever you encounter any iOS signing-related issues, you can quickly resolve them.
Prerequisite Knowledge: Digital Signatures & Digital Certificates#
Before discussing iOS signing, we first need to understand two prerequisite concepts: signatures ✒️ and certificates 📄 in the internet world.
Refer to: What are Digital Signatures and Digital Certificates?——Ruan Yifeng
Digital Signature#
A digital signature is generally embedded in the data to be transmitted to prevent data tampering.
Its underlying core is hash obfuscation algorithms and asymmetric encryption technology (public/private keys).
Generation#
The generation of a signature is performed by the sender in the communication. First, the data to be transmitted is hashed to obtain a data digest, and then the digest is encrypted with a private key, thus generating the data's signature.

Verification#
The receiver receives the data and signature from the sender and processes them as follows:
- Data: Use the same hash algorithm as the sender to obfuscate the data, obtaining data digest A;
- Signature: Use the public key corresponding to the private key used by the sender to decrypt the signature, obtaining data digest B.
Compare digest A and digest B; if they are equal, it indicates that the data has not been tampered with; otherwise, there is a problem with the data.

The process of generating and verifying the signature is illustrated in the diagram below; analyzing it again can deepen your understanding.

Moving forward with questions:
Q1: Speculate on the process of iOS signing and verification. Among app developers and app users, who is the sender, who is the receiver, and what is the data being transmitted?
A1: The app developer is the sender, the app user is the receiver, and the data being transmitted is the app installation package.
Q2: How does the receiver obtain the public key used for decryption?
Please continue reading.
Digital Certificate#
Before understanding digital certificates, we might immediately think that the sender could simply attach the public key when sending data and signatures, and everything would be ready~ As shown in the diagram below:

However, this introduces a new problem:
Q1: How does the receiver confirm that the public key has not been maliciously replaced by someone else? In other words, the identity of the public key is unclear.
This is where digital certificates come into play.
Composition#
Let's first look at the composition of a digital certificate, which consists of the public key, identity information of the public key, and their signature B.

Note: The private key used to encrypt the public key data is another public/private key pair issued by an authoritative certification authority (Certificate Authority, CA).
Public Key Wrapped in a Digital Certificate#
Now, the content sent by the sender has changed from data + signature + public key to data + signature + certificate.

The certificate contains the public key needed by the receiver to decrypt signature A, and in addition, the certificate also includes the public key's identity information and signature B:
- The existence of identity information eliminates the risk of unclear public key identity;
- And signature B guarantees that the public key and its identity information have not been tampered with.
However, because of signature B, we also need to verify the signature B in the certificate when obtaining the public key:

Note: The public key used to decrypt the signature B in the certificate is also issued by the CA, which exists in the CA certificate.
Now, I guess you can remember the composition of the certificate: public key + identity information of the public key + their signature.
Moving forward with questions:
Q1: Where does the receiver obtain this CA certificate? How does the receiver verify the signature of this CA certificate? It seems to enter an infinite loop ♻️.
Please continue reading.
Certificate Trust Chain#
CA certificates are generally built into the system/software during installation, so we should trust them, right?
Next, we can learn about the certificate trust chain.
Based on the position of the certificate in the trust chain, certificates can be divided into three types:
- Root Certificate
- Intermediate Certificate
- Leaf Certificate
For example: My developer certificate A (Apple Development) is issued by intermediate certificate B (Apple Worldwide Developer Relations Certification Authority, built into Xcode), intermediate certificate B is issued by root certificate C (Apple Root CA, built into the system), and root certificate C is issued by its own CA, as C is at the top of the trust chain, it has the final say.

Returning to the previous question: How to ensure that this CA certificate is trustworthy? As long as the receiver has the issuer's certificate, they can verify it using the public key in the certificate. For example, when an iPhone installs my developed app, it receives my developer certificate A, and the phone will look for the issuer's certificate B (Apple Worldwide Developer Relations Certification Authority, built into iOS) to verify if A is trustworthy.
Now, you can also check your Mac > Keychain software > Certificates to deepen your understanding.
Continuing with questions:
Q1: Is the CA private key used to encrypt the public key and its identity information located on our local computer? If not, how do we generate our certificate?
iOS Certificate Application Principles & Methods#
Of course not; these private keys are the secret treasures of the CA that issues certificates. For example, if we want to apply for an iOS developer certificate, we need to ask Apple for help, and Apple will use the intermediate certificate CA's private key mentioned above to issue the certificate.
Application Principles#
To apply for your own iOS developer certificate, it involves the following steps:
- Generate a public/private key pair on your computer and fill in the identity information for the key pair;
- Send the public key and its identity information to Apple CA;
- The CA uses a hash algorithm and the CA's private key to sign the data (public key and its identity information), and the data and signature together form the certificate we want;
- We then download the certificate from the CA to our computer, and after installing the certificate, the computer will automatically associate the corresponding private key.

Application Methods: 2 Types#
There are two specific application methods: 1) Uploading a CSR (CSR, Certificate Signing Request) file, and 2) Xcode automatic application method; the second method is recommended.
1) Uploading CSR File Method#
This method is suitable for those who want to understand the principles of iOS certificate application. Note: This method requires joining the Apple Developer Program, $99/year.
a) Open Keychain > Certificate Assistant > Request a Certificate From a Certificate Authority...:

b) Enter identity information (email, certificate name), and you can choose to save it locally. You will then obtain a CSR (.certSigningRequest) file, which contains the public key and its identity information.

You may ask, where is the private key stored? If you are attentive, you will notice that Keychain > login > Keys now has an additional public/private key pair you named.
c) Log in to the Apple Developer website, go to the Certificates, Identifiers & Profiles section, and upload the CSR file you just generated to create the certificate (.cer file). At this point, download the certificate to your local machine, double-click to import it into Keychain, and you can see the certificate in Keychain > login > My Certificates.

If you are attentive, you will find that the certificate in Keychain has already been bound to a private key. If you want to share the certificate with other developers, you need to right-click to export the familiar .p12 file, which contains the certificate and the corresponding private key.
2) Xcode Automatic Application Method (Recommended)#
This method does not require the cumbersome process of uploading a CSR file and downloading a .cer certificate, nor does it require you to join the Apple Developer Program.
a) Log in to your Apple account in Xcode: Xcode > Preferences > Accounts > Apple IDs > 「+」。

b) After logging in for a moment, you will find that a corresponding certificate has automatically appeared in Keychain.

Note: If you have joined the developer program, the Apple Developer website will also automatically add this certificate.
iOS Signing & Packaging Principles#
Finally, we arrive at the iOS signing part. How well do you understand the previous content? If you are still a bit confused, just remember that the purpose of signing is to prevent the transmitted data from being tampered with, and you will have grasped the essence of this article!
In fact, when signing iOS, it's not just about attaching the certificate (containing the public key); we also need to wrap the certificate with something we are familiar with, which is the Provisioning Profile file, also known as the PP file, description file, or supply configuration file.
PP File#
First, let's understand this important PP file; we can think of it as an upgraded version of the certificate.
How to Generate#
- Apply on the developer platform;
- Automatically generated by Xcode: Xcode > Targets > Signing & Capabilities > Check Automatically manage signing.
File Structure#
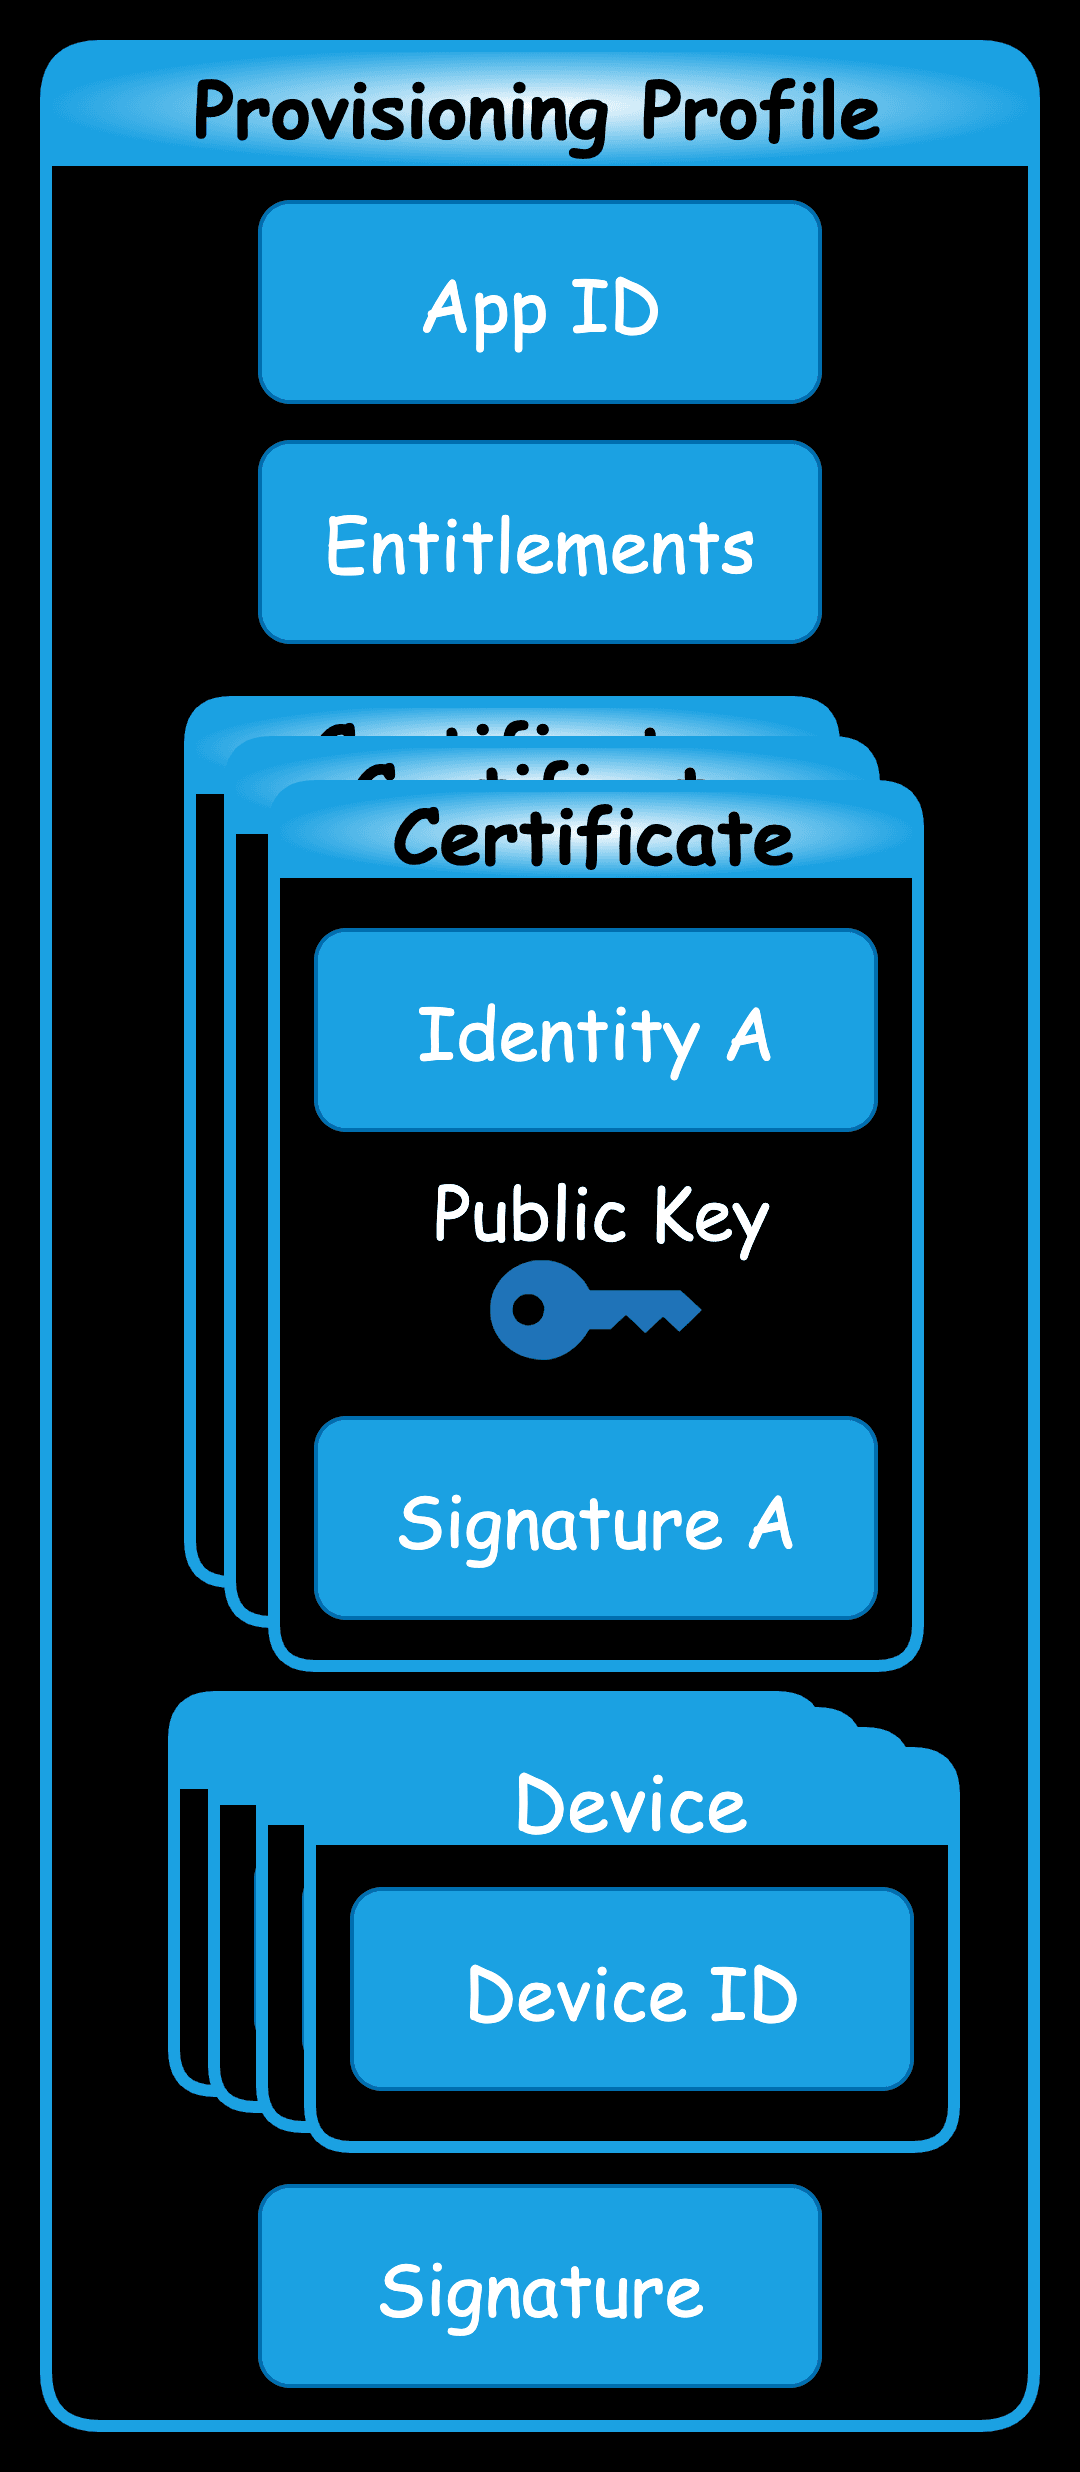
- App ID:
- Registered on the Apple developer platform; or automatically generated based on the Bundle ID filled in Xcode > Targets > Signing & Capabilities.
- The Bundle Identifier we fill in Xcode > Targets > Signing & Capabilities must match the App ID.
- Entitlements:
- A list of allowed permissions; the actual permissions used in the app must be a subset of this list, meaning the capabilities we add in Xcode > Targets > Signing & Capabilities cannot exceed its range.
- There will also be a .entitlements file (authorization file) in the project directory, which is automatically generated based on the capabilities added in Xcode > Targets > Signing & Capabilities. If the app uses a sandbox-restricted feature but the .entitlements file does not declare the corresponding permission, the app will crash when it runs the related code.
- Certificates: Composed of iOS developer certificates, there can be more than one, which are the iOS certificates applied for above.
- Devices: A list of iOS device UDIDs (Unique Device Identifiers) that limits which iOS devices can develop and debug the app.
- Signature: When generating the PP file, it is signed by Apple CA to prevent tampering.
Example#
The PP file is saved by default at: ~/Library/MobileDevice/Provisioning\ Profiles.
Below is a preview of a PP file automatically generated by Xcode:

Signing & Packaging#
The iOS signing and packaging process is actually controlled by Xcode. See the diagram below:

- First, Xcode checks whether the bundle ID in the app matches the App ID in the PP file and whether the permissions declared in the app's Entitlements (.entitlements) file are within the range of allowed permissions in the PP file. If either condition is false, the check fails;
- Next, Xcode looks in the computer's Keychain to see if there are any certificates that match the Certificates in the PP file. If a match is found, it proceeds to the next step;
- Then, Xcode checks whether the matched certificate is bound to the corresponding private key. If not, it cannot proceed to the next critical step—signing;
- Now, it begins to use the hash algorithm and private key to sign the app;
- Finally, it packages the app, PP file, and signature to generate the .ipa package.
⚠️: The above process ignores the verification of signature C and signature A; before using the PP file in step 1 and after matching the certificate in step 2, the signatures C and A should be verified using the CA public key to prevent tampering. If there are any errors, feel free to correct me.
Extended Questions:
Q1: What content will Xcode sign for the app?
A1: Everything. However, the signing process is quite complex, and I won't elaborate here. In short, to balance the security and efficiency of signing, the app's signing is divided into 4 hashes and 1 encryption, with each hash being interlinked to ensure that the app's content has not been tampered with.

For more details, refer to Detailed Explanation of iOS Code Signing (Part 3): The Signing Process and Data Structure of Code Signing.
iOS Verification Principles#
Having discussed iOS signing, how does the real device verify the app's signature during installation?
First, we need to know that app installation packages are divided into test packages and official packages, and the verification processes for the two are different.
Additionally, here is some knowledge about test packages and official packages:
- Test packages: These include internal test packages, release packages prepared for App Store upload, Ad Hoc release packages, and In-house enterprise internal release packages.
- Official packages: Installation packages uploaded to the App Store.
⚠️: Packages built by Xcode are all considered test packages.
Refer to Introduction to Different Types of iOS Test Packages——Sogou Testing Official Account.
Test Packages#
When installing test packages, the real device undergoes a complete verification process, as shown in the diagram below:

- First, the real device will use the system's built-in CA public key to verify the PP file and its signature C's legitimacy;
- Next, the real device will use the system's built-in CA public key to verify the legitimacy of the certificate in the PP file and its signature A; (The app contains the certificate information used to generate signature B, so the real device knows which certificate's public key to retrieve)
- Then, the real device retrieves the public key from the certificate to verify the legitimacy of the app and its signature B;
- Finally, the real device checks whether its UDID is in the Devices list of the PP file. If it exists, it will begin installing the app.
⚠️: The diagram simplifies the verification process. I believe you are already familiar with it: hash obfuscation, public key decryption, comparison...
In fact, the verification of the signature is not completed in one go; there are different verification rules during installation, startup, and runtime. The above process has been simplified; for more details, refer to Detailed Explanation of iOS Code Signing (Part 4): Signature Verification, Jailbreaking, and Resigning.
Official Packages#
When installing official packages, the verification process on the real device is greatly simplified because the verification of the developer certificate is handled by the App Store.
- Upload the release package to the App Store.

- When you upload the release package (a type of test package) to the App Store, Apple will also verify the release package, and the process is similar to the verification process for the above test package;
- After verification, the App Store will re-sign the app, using the CA private key instead of the private key corresponding to the developer certificate;
- Finally, the App Store will only package the app and the new signature to generate the .ipa package. (⚠️: The PP file is not included)
- The real device installs the official package.

When the device downloads the app from the App Store, it only needs to use the system's built-in CA public key to verify the app, and if the verification passes, it can install it.
Practice#
There are also some well-drawn diagrams online; you can review the process by number to reinforce the content of this article.

From iOS Certificate Matters——Juejin.

From The Principles of iOS App Signing——Blog.
Returning to: Article Goals#
Finally, let's return to the questions posed at the beginning of the article. To solve those questions, always remember two things: the certificate containing the private key (.p12 = .cer + private key) and the PP file (.mobileprovision).
Now, looking at our questions, we just need to find the above two items:
- How to run your own iOS project or iOS open-source library on a real device?
- Certificate containing the private key: Refer to the iOS certificate application methods section;
- PP file: Apply on the developer platform; or automatically generated by Xcode, Targets > Signing & Capabilities > Check Automatically manage signing.
- How to run the company's iOS project on a real device?
- Certificate containing the private key: Request from the team, noting that the file extension is .p12;
- PP file: Request from the team, and remember to ask the person in charge to add your real device's UDID to the PP file on the developer platform.
PS:
- When running the app installed from a test package, you generally also need to trust the certificate on the real device: Settings > General > VPN & Device Management.
- Xcode automatically generates PP files:

References#
Overall grasp: The Principles Behind iOS Certificates——Blog
In-depth understanding: Detailed Explanation of iOS Code Signing——Blog
Other resources you might be interested in: